Feeds:
Posts
Comments

Archive for December, 2008

* Display the longest and shortest usernames on the system (usernames are in the first field in /etc/passwd).

script22

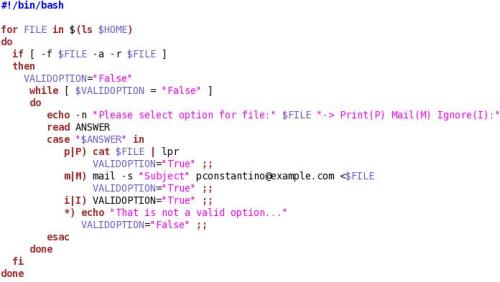
* Loop through the files in your home directory, and for each readable file, ask whether the file should be printed, mailed to you, or ignored (P/M/I) and then take the appropriate action.

script1

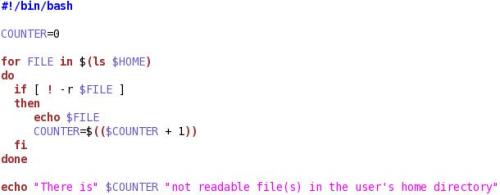
*Count the number of files in the user’s home directory which are not readable.

six2

Read Full Post »

To edit videos in Linux based systems there are a lot of available choices, lets talk about a specific software that I have used for edit and export raw videos: Kino.

Kino is a video editor software which has options for cut scenes, apply some special effects, export video to a different formats and some other features. The help manual is short but a lot clear and you can see example images.

For apply special effects for example you can just click on FX Icon (ubicated in the right side panel) and specify the time that the effect should start and finish:

range1

and apply either Audio or Video filters that you prefer:

Example of Soft Focus Video Filter

Example of Soft Focus Video Filter

The list of Audio effects includes: Dub, Fade In, Fade Out, Gain, Mix and Silence.

Options for Video filters include: Blur, Charcoal, Colour Average, Colour Hold, Flip, Jerky, Kaleidoscope, Levels, Mirror, Pan and Zoom, Pixelate, Soft Focus, Superimpose, Titler and some others…

Video with Pixelate and Titler effects...

Video with Pixelate and Titler effects...

I used Pixelate and Titler video filters, and fade out and silence audio filters for the closing part of my video; I cut just a small piece from the video where the effects can be appreciated, so if you want to take a look and see how this effects look like click here.

Also this software is capable to export video to different formats such as: DVD, Flash, H.264 MP4, MP3, MPEG-4 3GPP, MPEG-4 AVI, OGG, VCD and some others… (the videos in the link are in OGG and Flash formats).

Kino works good with videos not too big, and editing is relatively easy, it has a very simple graphic interface and exporting files to other formats is fast and works very well.

Read Full Post »

In a previous post I talked about how to make your own Live CDs, now I will talk about how to make a Custom CD (Spin) using “Pungi”.

The tricky part is make a kickstart file, to see more information about how create kickstart files visit this link: http://fedoraproject.org/wiki/Anaconda/Kickstart#Creating_the_Kickstart_File.

This a example of one:

repo –name=release –mirrorlist=http://mirrors.fedoraproject.org/mirrorlist?repo=fedora-9&arch=$basearch
repo –name=updates –mirrorlist=http://mirrors.fedoraproject.org/mirrorlist?repo=updates-released-f9&arch=$basearch

%packages –nobase
bash
kernel
passwd
policycoreutils
chkconfig
authconfig
rootfiles
anaconda-runtime
isomaster
pingus

%end

To tell Pungi to make a spin out of that file, type this command in the shell window:
#pungi -c <kickstartfile.cfg> –nosource –force –ver=<DestinyDirectory>

You will get a Directory, with a iso image inside, next thing is burn it or use the qemu tool to try it (to a view of its use check “Using Fedora livecd-tools” post).

Read Full Post »

What is a live CD or live DVD?

A live CD or DVD is designed in a special way that when is run, the system contained on it appears in the screen as similar as possible to the standard system with all the features that can be possible included, and when the the CD/DVD is ejected from the computer (reboot may be necessary) the original system is returned as usual.

The term “live” derives from the fact that these CDs each contain a complete, functioning and operational operating system. There are also Live USB flash drives which are similar to live CDs, but often have the added functionality of automatically and transparently writing changes back to their bootable medium.

So in this post I will talk about how to generate live CDs or DVD’s on Fedora based systems, giving an example procedure. Here the steps:

* Login as root in a Machine with Fedora Operative System.

* Install Live cd tools by typing in the command line:
# yum install livecd-tools

This will install some kickstarts files in this location: /usr/share/livecd-tools, the files generated will depend of with version of Fedora you are working with, I’m using Fedora 9 (then it created files from all the Fedora previous versions until the one that I’m using), these are the list of files that I got in my machine:

livecd-fedora-7-desktop.ks
livecd-fedora-7-kde.ks
livecd-fedora-8-base-desktop.ks
livecd-fedora-8-desktop.ks
livecd-fedora-8-developer.ks
livecd-fedora-8-electronic-lab.ks
livecd-fedora-8-games.ks
livecd-fedora-8-kde.ks
livecd-fedora-9-base-desktop.ks
livecd-fedora-9-desktop.ks
livecd-fedora-9-kde.ks
livecd-fedora-base-desktop.ks
livecd-fedora-desktop.ks
livecd-fedora-developer.ks
livecd-fedora-electronic-lab.ks
livecd-fedora-games.ks
livecd-fedora-kde.ks
livecd-fedora-minimal.ks
livedvd-fedora-kde.ks

* Pick one of them (I used: livecd-fedora-9-base-desktop.ks).

* For avoid problems related to selinux, I disabled it, by editing the file and changing the correspondent line, like this:

selinux –disabled

* Saved your changes and in the command line type:
# livecd-creator -c livecd-fedora-9-base-desktop.ks

This will generate a iso image with your chosen live CD option. This may take some time so… you might have enough time for a cup of tea (I was working with a wireless connection so I could have the entire dinner!).

When it finished, you will have a new file, this is the one that I got: livecd-fedora-9-base-desktop-200812061928.iso

Now you can either burn it or use tools like qemu  and kvm to try it out. If you choose the second option, you should install those packages, in the command line type:
# yum install kvm qemu

Once it finish, type:
# qemu-kvm -m 512 -cdrom livecd-fedora-9-base-desktop-200812061928.iso

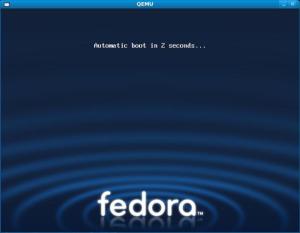
and if everything is correct then you will be able to see a screen like this:

qemu

QEMU running a Live CD iso image

References:
1. http://fedoraproject.org/wiki/How_to_create_and_use_Fedora_LiveCD
2. http://en.wikipedia.org/wiki/Live_CD

Read Full Post »

Have you needed to install a OS in more than 10 computers? doing the same things in each computer such as selecting the timezone, the hard drive/partition for installation, choosing which applications want install or not install, etc., etc…, one by one…

This task could be a lot more easier with a customized installation CD/DVD, and make one is totally possible by editing a single file: the kickstart.

During the installation process Anaconda uses it. Anaconda is the installation program used by Fedora, Red Hat Enterprise Linux and some other distributions.

Anaconda in Fedora 9

Anaconda in Fedora 9

Anaconda is a fairly sophisticated installer. It supports installation from local and remote sources such as CDs and DVDs, images stored on a hard drive, NFS, HTTP, and FTP. Installation can be scripted with kickstart to provide a fully unattended installation that can be duplicated on scores of machines. [1]

I will describe this process using Fedora 9, its Installation CD or DVD is needed. Here the steps:

* Install Fedora 9 (I did it in a second drive, we will use the kickstart file of this installation).

* Login into this new installed system.

* Install k3b-> in the shell window type:
# yum install k3b

* In the same way install ISO Master:
# yum install isomaster

* Open k3b (Applications -> Sound & Video -> k3b) and insert your Fedora installation CD/DVD in your machine.

* Make a iso image of it. (Menu: Tools -> copy CD/DVD. In settings check the option “Only create a image“).

* Look for the kickstart file of the current installation, (should be in: /root/anaconda-ks.cfg), copy and paste it in another location, call this copy ks.cfg.

* Change its permissions to be able to edit it.

* This is the important part, you can make changes on it, according to your needs, in our case, we need to install in a second drive of some machines, so for this, was necessary to modify the “bootloader” line (thanks to my friend Nestor the Master for help on this!), find it and, instead of “–location=mbr” type “–location=sdb“, so the line should looks like this:
“bootloader –location=sdb –driveorder=sda,sdb –apppend=”rhgb quiet””

* Once done this, open ISO Master (Applications -> ISO Master) and open the ISO image that you made with k3b.

* We have to add “ks=cdrom” to the install boot prompt, find the file: /isolinux/isolinux.cfg, open it and locate the line “append initrd=initrd.img“, add “ks=cdrom“, to make it like this:
append initrd=initrd.img ks=cdrom

* Add your ks.cfg file to your ISO image.

* Burn the ISO image into a blank CD/DVD.

Now everything is ready, you can try your customized installation CD/DVD…

If you need more information about this topic visit: http://fedoraproject.org/wiki/Anaconda/Kickstart

References:
[1] http://fedoraproject.org/wiki/Anaconda

Read Full Post »

In the next lines I will describe how to use the program dvd-slideshow which is command line based and is used to create slideshow videos (that later on can be burned in a DVD)…

So let’s start getting the software by the command line typping:
# yum install dvd-slideshow

Next, put all the pictures or images that you want to include in the video, together in a directory (I called mine “Flowers”)

One important thing that I noticed when I used this program is that the name of each image should not have spaces… so for example if you have names like this: “My parents anniversary”, you should change it for “MyParentsAnniversary”, “My_parents_anniversary”… or any other way but with no spaces.

Just for more comfort work in the same path that is your picture directory, and type these commands:
# dir2slideshow -n “Flowers” -t 3 Flowers/

It will create an input file, with information about the pictures and -sometimes depends what you add- some values for parameters like crossfade, fadein, fadeout, title, background, etc… you can modify this command maybe like this:
# dir2slideshow -t 3 -c 2 -b /home/Paty/Pictures/Seneca.jpg -n “Flowers” Flowers/
where:
-t -> seconds that each picture is showed.
-c -> is the number of seconds to crossfade between images.
-b -> this option is for specify a image background.
-n -> name for the slideshow.
(check man page for more options)

Next step is create the video file:
# dvd-slideshow -n “Flowers” -f Flowers.txt
In the same way you can play with options like adding music for example, up to you.

It may get you some error message, telling you that mjpegtools are missed, if that is the case install them like this:
# yum install mjpegtools

Another important thing is, if you get this message:
….
[dvd-slideshow] Creating ac3 audio…
[dvd-slideshow] ERROR during ffmpeg execution!
…..

Then is necessary to edit the file /usr/bin/dvd-slideshow and change the line 661 like this:
ac3=0

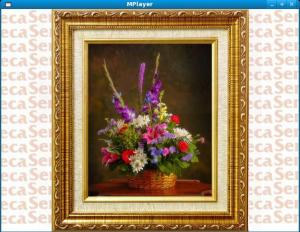
To see the video, you can install Mplayer for example (#yum install mplayer) and after just type this:
# mplayer Flowers.vob

mplayer

Have fun!

Read Full Post »